Build a DIY Koi Pond
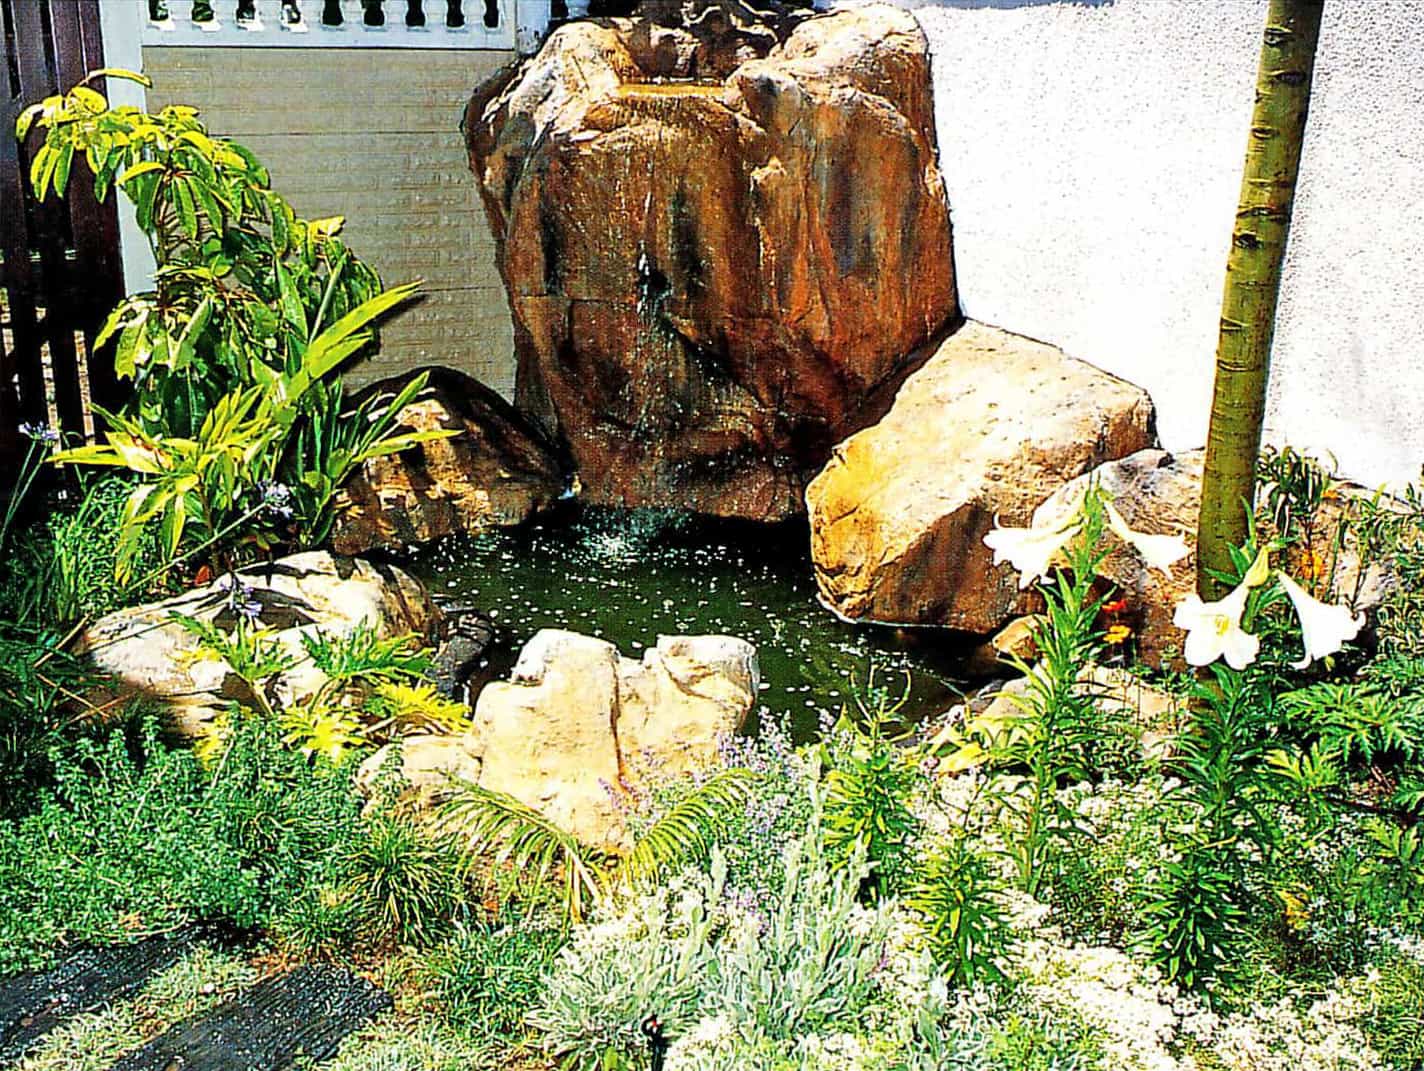
Roughly formed with concrete, this DIY koi pond was specially designed to accommodate and display a small quantity of koi. It is 500 mm (1 ft 8 in) deep, the minimum required for these ornamental fish, and a biological filter has been fitted. This feature incorporates attractive man-made rocks around the perimeter. If similar fake rocks are not available in your area, a more conventional rockery could be assembled and constructed in the same way.
You might have searched for:
• How to build a koi pond step by step
• How to build a koi pond cheap
• How to build a koi pond above ground
• How to build a koi pond in your backyard
• How to build a koi pond with concrete
• How to build a koi pond with waterfall
Materials
For this 5 m² (65 sq ft) DIY koi pond:
1 x 3 m x 3 m x 6 mm (9ft 10 in x 9ft 10 in x ¼ in) reinforcing mesh
250 kg (550 lb) cement
0.45 m³ (16 cu ft) sand
300 kg (8 cu ft) stone
waterproofing additive (optional)
15 liters (3 gal) rubberized bitumen sealer (depending on brand)
To build the rockery (optional)
2.5 m x 76 mm (8 ft 2 in x 3 in) galvanized metal pole
wire mesh
glass fiber reinforced cement (GRC) rock panels OR rocks
mortar
submersible pump, with a water head compatible with the rockery height
biological filter
pipework and connectors (dependent on configuration of rockery)
outdoor cable and conduit
Here are a few items you will need for this pond:
Crack hammer
Rubberized bitumen sealer
Shovel
Plaster Trowel
Submersible pond pump
Preparation
Step 1 – Mark Out Pond
Decide exactly where you want the DIY koi pond and mark it out with a hose or rope.
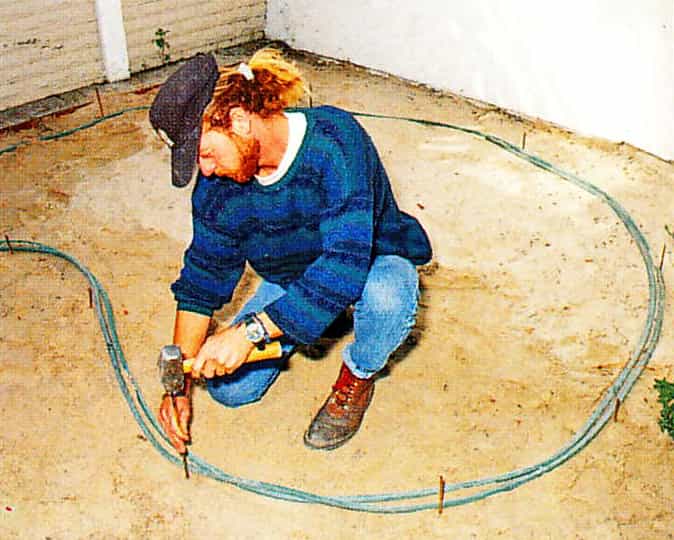
Step 2 – Peg Out
Knock metal pegs into the ground around the perimeter of the proposed pond at intervals of approximately 5OO mm (1 ft 8 in). These will enable you to establish the level of the ground surrounding the pool.
Step 3 – Datum Point
Before you start digging the hole, establish a datum point which will enable you to mark the height of the proposed finished surface around the pond. Do this by hammering in one of the pegs inserted into the highest level of ground, so that its apex is at the correct height. Then use a spirit level to accurately adjust all the other pegs so that their tops are even. If you have a dumpy level, you can speed up and simplify this operation. You will, however, need to work with a helper.
Excavation
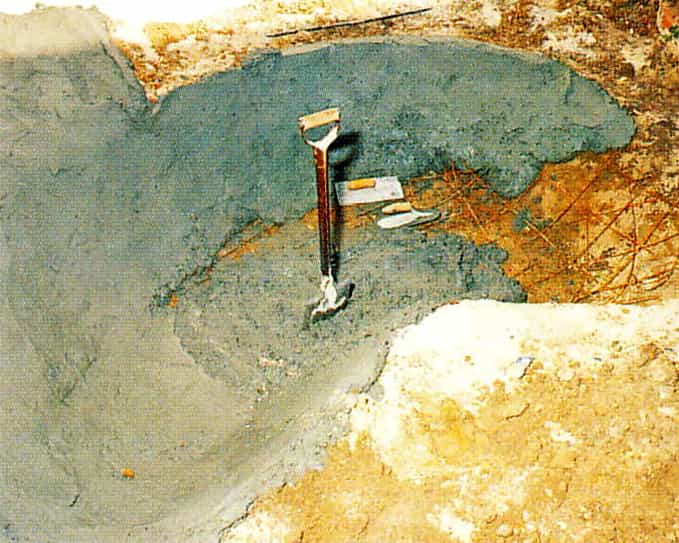
Step 4 – Normal Excavation
The excavation of this DIY koi pond is exactly the same as all the others. However, it is more important to slope the sides slightly because of this particular method of construction. Make sure the pegs remain in position once the hole has been dug.
Reinforcing
Step 5 – Line With Reinforcing Mesh
Once the hole is ready, line it with the reinforcing mesh; this steel reinforcing will make the pond more stable and help to stop it from cracking. Since this is an informal pool with an irregular shape, it will be necessary to cut some of the mesh to get it to fit. You can do this without too much effort if you use a hack-saw or bolt cutters. Bend and then push the ends you have cut into the soil to keep it in position. To ensure an even thickness of concrete, it is useful to insert small chips of brick to form spacers between the mesh and the earth.
Step 6 – Mix Concrete
Working in batches, mix together a total of three bags of the cement and approximately 300 kg (600 lb or 8 cu ft) each of sand and stone; the correct amount of waterproofing additive (based on the manufacturer’s instructions) and just enough water to make the concrete pliable. Remember to mix only as much as you can place in two hours.
Step 7 – Slab For Rockery
If you are incorporating a rockery, throw a concrete slab at one end of the pond to form a supporting shelf. If you (or a landscaping specialist) are using GRC panels, it will be necessary to embed a metal pole in the center of the slab to brace and support them. Note that a feature made with natural rocks will require more space than one made with panels.
Step 8 – Shovel Concrete Mix
Shovel the concrete mix into the hole and use a trowel followed by a float to smooth the surface.
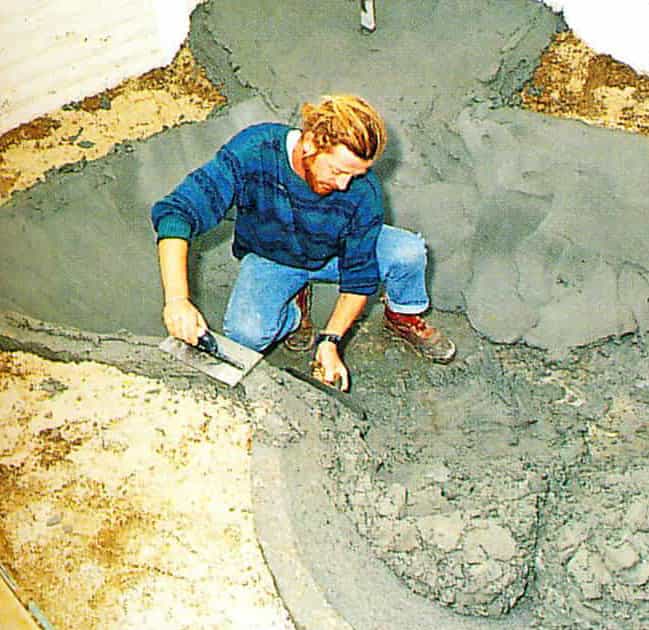
Step 9 – Check With Pegs
The completed concrete shell should be about 80 mm (3 in) thick. Make sure that the upper lip is level with the top of the pegs previously inserted around the circumference of the pond.
Step 10 – Spirit Level
Use a spirit level and a water level to check that the upper surface of the shell is level. You can also use a dumpy level, but these are cumbersome and considerably more expensive.
Step 11 – Let Concrete Set
allow the concrete to set for at least 48 hours.
Plaster or render
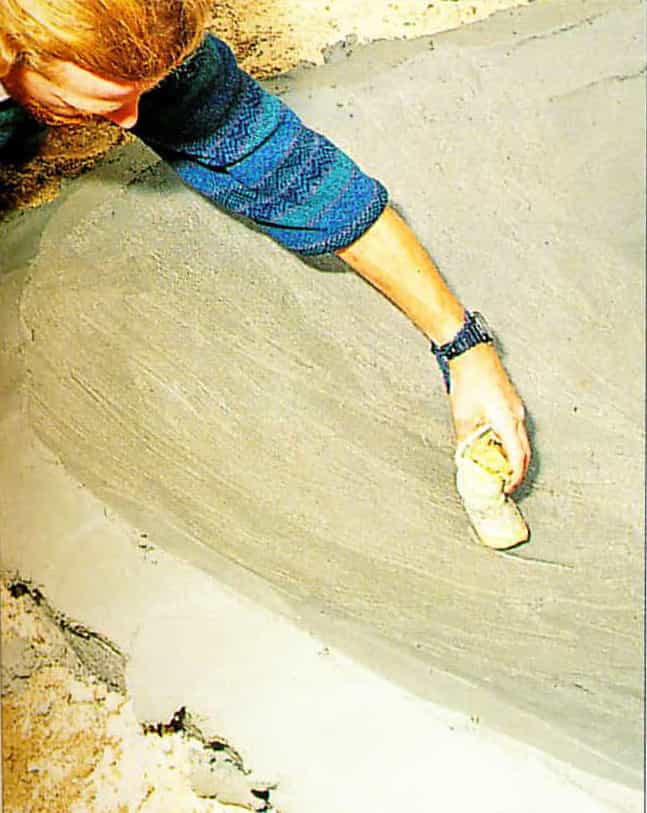
Step 12 – Finishing And Waterproofing
You will need a good, strong render mix to finish the pond. The remaining cement and sand will give you a 1:3 mix, which is recommended not only for ponds, but for reservoirs and swimming pools as well. It is a good idea to add a waterproofing agent to this too. Use a round trowel like those employed by pool builders to render the pond. Then take a damp sponge and smooth the surface.
Submersible Pumps For This Pond
| Products | Product Description | Star Rating | Check Price |
|---|---|---|---|
 | VIVOHOME Electric 120W 2700GPH Submersible Water Pump for Koi Pond Pool Waterfall Fountains | , https://www.thepondprofessor.com/wp-content/uploads/2021/08/4-half-Stars-AMA-S.jpg, https://www.thepondprofessor.com/wp-content/uploads/2021/08/4-half-Stars-AMA-S.jpg, 4-half-Stars-AMA-S |  |
 | Alpine Corporation Alpine PAL3100 Cyclone Pond Pump-3100 Fountains, Waterfalls, and Water Circulation Pump, 3100 GPH, Black | , https://www.thepondprofessor.com/wp-content/uploads/2021/08/4-half-Stars-AMA-S.jpg, https://www.thepondprofessor.com/wp-content/uploads/2021/08/4-half-Stars-AMA-S.jpg, 4-half-Stars-AMA-S | |
 | Little Giant 566417 WGP-80-PW Dual Discharge Direct Drive Submersible Waterfall and Pond Pump, 673 Watts, 3,500 GPH | , https://www.thepondprofessor.com/wp-content/uploads/2021/08/4-half-Stars-AMA-S.jpg, https://www.thepondprofessor.com/wp-content/uploads/2021/08/4-half-Stars-AMA-S.jpg, 4-half-Stars-AMA-S | |
Pump and filter
Step 13 – Pipework & Electrics
Install all pipework and fit any necessary electrical connections before you finish the DIY koi pond or build a rockery. NOTE: While guidelines are given, the factors involved are variable and those DIY builders without adequate experience in this field, should seek assistance from an electrician and possibly also a plumber.
The pump used here is an immersible one, while the filter is hidden above ground, behind the rock feature. The 32 mm (1¼ in) tubing from the pump is routed up behind the rockery with the aid of various connectors. Once installation is complete, the pump will then discharge water into a pre-cast bowl which spills into the pond.
The Rockery
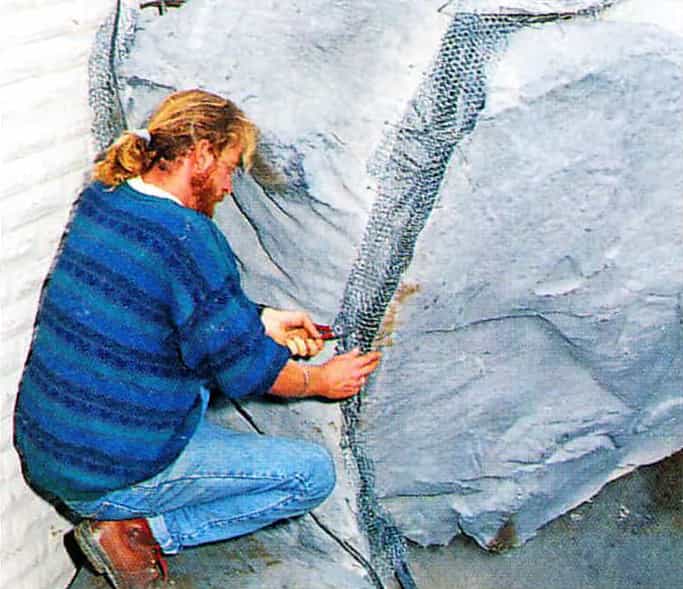
Step 14 – Construct Rockery
The rockery may now be constructed on the concrete shelf behind the pond. The lightweight panels are wired and welded to the metal pole in a simple, yet ingenious manner. Wire mesh is then attached between the panels, to cover all gaps.
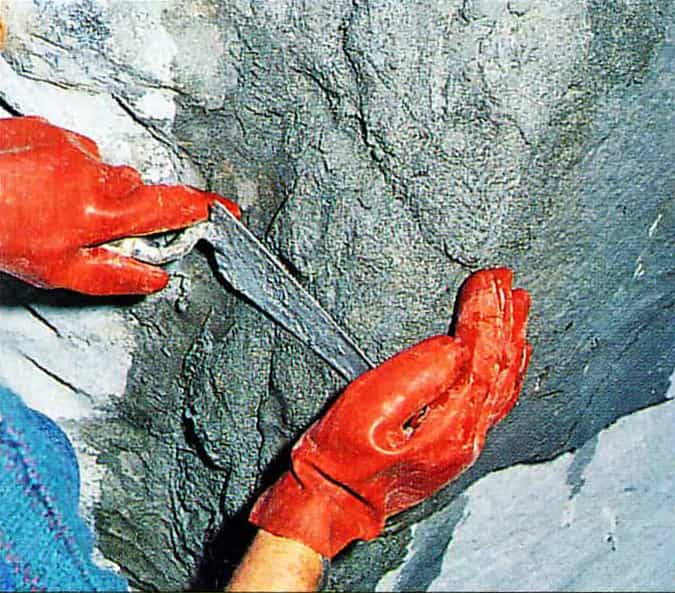
Step 15 – Render
Using the same 1:3 render mix, the mesh (or chicken wire) is completely covered with a roughly rendered coat. This mixture is troweled on and then manipulated so that it blends with the molded GRC panels.
Step 16 – Painting
When the render is completely dry, the rock feature is spray painted in colors of natural stone.
Sealing
Step 17 – Extra Coats
Even though the waterproofing agent added to the concrete and render will ensure a reasonably waterproof shell, it is advisable to give the interior surface of the pond at least two coats of a rubberized bitumen sealant. The emulsion product used here was diluted for the first coat and applied full strength for the second.
Waterproof Sealers
| Product Description | Star Rating | Check Price | |
|---|---|---|---|
 | Liquid Rubber Waterproof Sealant - Multi-Surface Leak Repair Indoor and Outdoor Coating, Water-Based, Easy to Apply | , https://www.thepondprofessor.com/wp-content/uploads/2021/08/4-half-Stars-AMA-S.jpg, https://www.thepondprofessor.com/wp-content/uploads/2021/08/4-half-Stars-AMA-S.jpg, 4-half-Stars-AMA-S | |
 | Jetcoat Cool King Reflective Acrylic Coating, Waterproof Elastomeric Sealant, 5 Gallon | , https://www.thepondprofessor.com/wp-content/uploads/2021/08/4-half-Stars-AMA-S.jpg, https://www.thepondprofessor.com/wp-content/uploads/2021/08/4-half-Stars-AMA-S.jpg, 4-half-Stars-AMA-S | |
 | Liquid Rubber NeoPond Waterproof Pond Sealant - Fish and Plant Safe Waterproofing Membrane Sealer for Ponds and Water Features | , https://www.thepondprofessor.com/wp-content/uploads/2021/08/4-half-Stars-AMA-S.jpg, https://www.thepondprofessor.com/wp-content/uploads/2021/08/4-half-Stars-AMA-S.jpg, 4-half-Stars-AMA-S | |
Finishing Off
Step 18 – Fill Pond
When the bitumen is dry, fill the pond. The area around it can also be landscaped and planted. Allow all water plants to become reasonably established before introducing the koi.
NEXT: Natural Water Gardens >>
<< BACK TO: Step-by-Step


5 Comments